「源码解析 」这一次彻底弄懂react-router路由原理

写在前面:为什么要学习react-router底层源码? 为什么要弄明白整个路由流程? 笔者个人感觉学习react-router,有助于我们学习单页面应用(spa)路由跳转原理,让我们理解从history.push,到组件页面切换的全套流程,使我们在面试的时候不再为路由相关的问题发怵,废话不说,让我们开启深入react-router源码之旅吧。
一 正确理解react-router
1 理解单页面应用
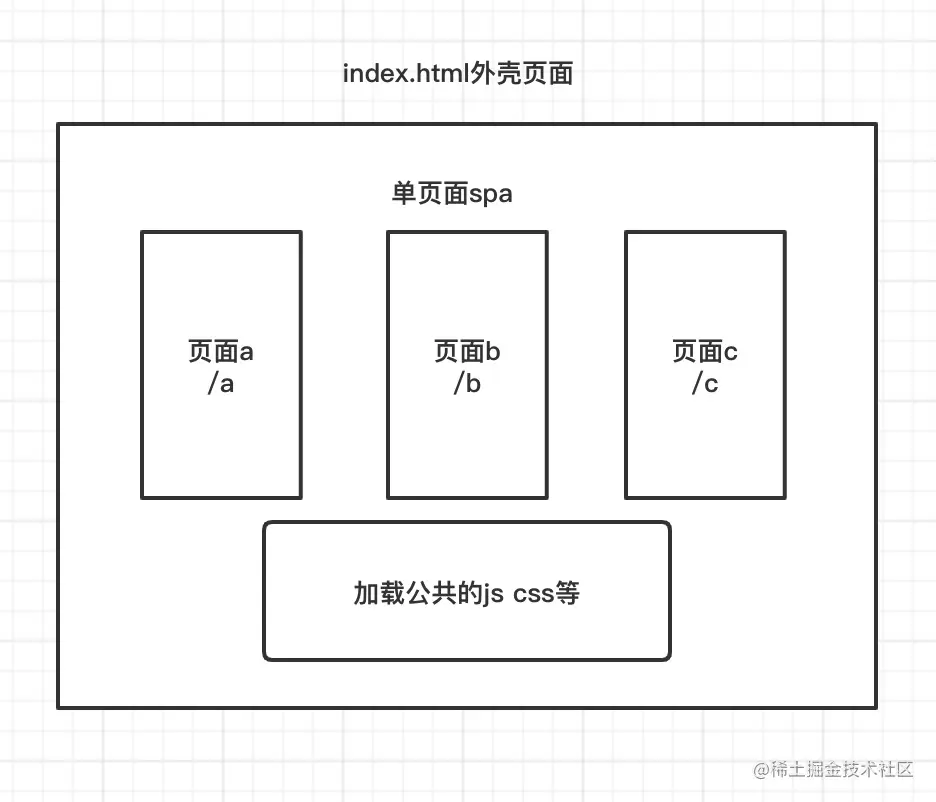
什么是单页面应用?
个人理解,单页面应用是使用一个html下,一次性加载js, css等资源,所有页面都在一个容器页面下,页面切换实质是组件的切换。
2 react-router初探,揭露路由原理面纱
①react-router-dom和react-router和history库三者什么关系
history 可以理解为react-router的核心,也是整个路由原理的核心,里面集成了popState,history.pushState等底层路由实现的原理方法,接下来我们会一一解释。
react-router可以理解为是react-router-dom的核心,里面封装了Router,Route,Switch等核心组件,实现了从路由的改变到组件的更新的核心功能,在我们的项目中只要一次性引入react-router-dom就可以了。
react-router-dom,在react-router的核心基础上,添加了用于跳转的Link组件,和histoy模式下的BrowserRouter和hash模式下的HashRouter组件等。所谓BrowserRouter和HashRouter,也只不过用了history库中createBrowserHistory和createHashHistory方法
react-router-dom 我们不多说了,这里我们重点看一下react-router。
②来个小demo尝尝鲜?
js 体验AI代码助手复制代码import { BrowserRouter as Router, Switch, Route, Redirect,Link } from 'react-router-dom'
import Detail from '../src/page/detail'
import List from '../src/page/list'
import Index from '../src/page/home/index'
const menusList = [
{
name: '首页',
path: '/index'
},
{
name: '列表',
path: '/list'
},
{
name: '详情',
path: '/detail'
},
]
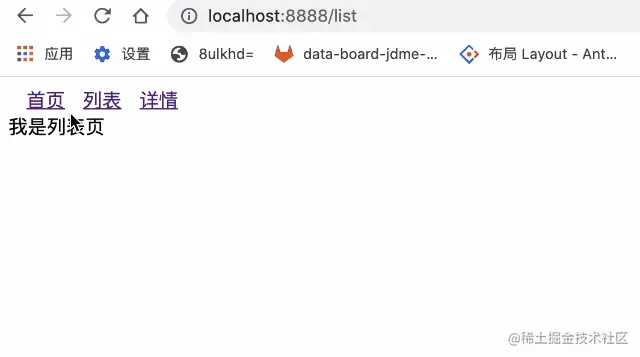
const index = () => {
return{
/* link 路由跳转 */
menusList.map(router=>{router.name})
}{/* 路由不匹配,重定向到/index */}}效果如下
二 单页面实现核心原理
单页面应用路由实现原理是,切换url,监听url变化,从而渲染不同的页面组件。
主要的方式有history模式和hash模式。
1 history模式原理
①改变路由
history.pushState
js 体验AI代码助手复制代码history.pushState(state,title,path)
1 state:一个与指定网址相关的状态对象, popstate 事件触发时,该对象会传入回调函数。如果不需要可填 null。
2 title:新页面的标题,但是所有浏览器目前都忽略这个值,可填 null。
3 path:新的网址,必须与当前页面处在同一个域。浏览器的地址栏将显示这个地址。
history.replaceState
js 体验AI代码助手复制代码history.replaceState(state,title,path)
参数和pushState一样,这个方法会修改当前的 history 对象记录, history.length 的长度不会改变。
②监听路由
popstate事件
js 体验AI代码助手复制代码window.addEventListener('popstate',function(e){
    /* 监听改变 */
})
同一个文档的 history 对象出现变化时,就会触发 popstate 事件history.pushState 可以使浏览器地址改变,但是无需刷新页面。注意⚠️的是:用 history.pushState() 或者 history.replaceState() 不会触发 popstate 事件。 popstate 事件只会在浏览器某些行为下触发, 比如点击后退、前进按钮或者调用 history.back()、history.forward()、history.go()方法。
2 hash模式原理
①改变路由
window.location.hash
通过window.location.hash 属性获取和设置 hash 值。
②监听路由
onhashchange
js 体验AI代码助手复制代码window.addEventListener('hashchange',function(e){
    /* 监听改变 */
})
三 理解history库
react-router路由离不开history库,history专注于记录路由history状态,以及path改变了,我们应该做写什么,
在history模式下用popstate监听路由变化,在hash模式下用hashchange监听路由的变化。
接下来我们看 Browser模式下的createBrowserHistory 和 Hash模式下的 createHashHistory方法。
1 createBrowserHistory
Browser模式下路由的运行 ,一切都从createBrowserHistory开始。这里我们参考的history-4.7.2版本,最新版本中api可能有些出入,但是原理都是一样的,在解析history过程中,我们重点关注setState ,push ,handlePopState,listen方法
js 体验AI代码助手复制代码const PopStateEvent = 'popstate'
const HashChangeEvent = 'hashchange'
/* 这里简化了createBrowserHistory,列出了几个核心api及其作用 */
function createBrowserHistory(){
    /* 全局history  */
    const globalHistory = window.history
    /* 处理路由转换,记录了listens信息。 */
    const transitionManager = createTransitionManager()
    /* 改变location对象,通知组件更新 */
    const setState = () => { /* ... */ }

    /* 处理当path改变后,处理popstate变化的回调函数 */
    const handlePopState = () => { /* ... */ }

    /* history.push方法,改变路由,通过全局对象history.pushState改变url, 通知router触发更新,替换组件 */
    const push=() => { /*...*/ }

    /* 底层应用事件监听器,监听popstate事件 */
    const listen=()=>{ /*...*/ }
    return {
       push,
       listen,
       /* .... */
    }
}
下面逐一分析各个api,和他们之前的相互作用
js 体验AI代码助手复制代码const PopStateEvent = 'popstate'
const HashChangeEvent = 'hashchange'
popstate 和hashchange是监听路由变化底层方法。
①setState
js 体验AI代码助手复制代码const setState = (nextState) => {
    /* 合并信息 */
    Object.assign(history, nextState)
    history.length = globalHistory.length
    /* 通知每一个listens 路由已经发生变化 */
    transitionManager.notifyListeners(
      history.location,
      history.action
    )
}代码很简单:统一每个transitionManager管理的listener路由状态已经更新。
什么时候绑定litener, 我们在接下来的React-Router代码中会介绍。
②listen
js 体验AI代码助手复制代码const listen = (listener) => {
    /* 添加listen */
    const unlisten = transitionManager.appendListener(listener)
    checkDOMListeners(1)

    return () => {
      checkDOMListeners(-1)
      unlisten()
    }
}
checkDOMListeners
js 体验AI代码助手复制代码const checkDOMListeners = (delta) => {
    listenerCount += delta
    if (listenerCount === 1) {
      addEventListener(window, PopStateEvent, handlePopState)
      if (needsHashChangeListener)
        addEventListener(window, HashChangeEvent, handleHashChange)
    } else if (listenerCount === 0) {
      removeEventListener(window, PopStateEvent, handlePopState)
      if (needsHashChangeListener)
        removeEventListener(window, HashChangeEvent, handleHashChange)
    }
}listen本质通过checkDOMListeners的参数 1 或 -1 来绑定/解绑 popstate 事件,当路由发生改变的时候,调用处理函数handlePopState 。
接下来我们看看push方法。
③push
js 体验AI代码助手复制代码 const push = (path, state) => {
    const action = 'PUSH'
    /* 1 创建location对象 */
    const location = createLocation(path, state, createKey(), history.location)
    /* 确定是否能进行路由转换,还在确认的时候又开始了另一个转变 ,可能会造成异常 */
    transitionManager.confirmTransitionTo(location, action, getUserConfirmation, (ok) => {
      if (!ok)
        return
      const href = createHref(location)
      const { key, state } = location
      if (canUseHistory) {
        /* 改变 url */
        globalHistory.pushState({ key, state }, null, href)
        if (forceRefresh) {
          window.location.href = href
        } else {
          /* 改变 react-router location对象, 创建更新环境 */
          setState({ action, location })
        }
      } else {
        window.location.href = href
      }
    })
  }
push ( history.push ) 流程大致是 首先生成一个最新的location对象,然后通过window.history.pushState方法改变浏览器当前路由(即当前的path),最后通过setState方法通知React-Router更新,并传递当前的location对象,由于这次url变化的,是history.pushState产生的,并不会触发popState方法,所以需要手动setState,触发组件更新。
④handlePopState
最后我们来看看当popState监听的函数,当path改变的时候会发生什么,
js 体验AI代码助手复制代码/* 我们简化一下handlePopState */
const handlePopState = (event)=>{
     /* 获取当前location对象 */
    const location = getDOMLocation(event.state)
    const action = 'POP'

    transitionManager.confirmTransitionTo(location, action, getUserConfirmation, (ok) => {
        if (ok) {
          setState({ action, location })
        } else {
          revertPop(location)
        }
    })
}
handlePopState 代码很简单 ,判断一下action类型为pop,然后 setState ,从新加载组件。
2 createHashHistory
hash 模式和 history API类似,我们重点讲一下 hash模式下,怎么监听路由,和push , replace方法是怎么改变改变路径的。
监听哈希路由变化
js 体验AI代码助手复制代码  const HashChangeEvent = 'hashchange'
  const checkDOMListeners = (delta) => {
    listenerCount += delta
    if (listenerCount === 1) {
      addEventListener(window, HashChangeEvent, handleHashChange)
    } else if (listenerCount === 0) {
      removeEventListener(window, HashChangeEvent, handleHashChange)
    }
}和之前所说的一样,就是用hashchange来监听hash路由的变化。
改变哈希路由
js 体验AI代码助手复制代码
/* 对应 push 方法 */
const pushHashPath = (path) =>
  window.location.hash = path

/* 对应replace方法 */
const replaceHashPath = (path) => {
  const hashIndex = window.location.href.indexOf('#')

  window.location.replace(
    window.location.href.slice(0, hashIndex >= 0 ? hashIndex : 0) + '#' + path
  )
}在hash模式下 ,history.push 底层是调用了window.location.href来改变路由。history.replace底层是掉用window.location.replace改变路由。
总结
我们用一幅图来描述了一下history库整体流程。

四 核心api
1 Router-接收location变化,派发更新流
Router 作用是把 history location 等路由信息 传递下去
Router
js 体验AI代码助手复制代码/* Router 作用是把 history location 等路由信息 传递下去  */
class Router extends React.Component {
  static computeRootMatch(pathname) {
    return { path: '/', url: '/', params: {}, isExact: pathname === '/' };
  }
  constructor(props) {
    super(props);
    this.state = {
      location: props.history.location
    };
    //记录pending位置
    //如果存在任何,则在构造函数中进行更改
    //在初始渲染时。如果有,它们将在
    //在子组件身上激活,我们可能会
    //在安装之前获取一个新位置。
    this._isMounted = false;
    this._pendingLocation = null;
    /* 此时的history,是history创建的history对象 */
    if (!props.staticContext) {
      /* 这里判断 componentDidMount 和 history.listen 执行顺序 然后把 location复制 ,防止组件重新渲染 */
      this.unlisten = props.history.listen(location => {
        /* 创建监听者 */
        if (this._isMounted) {

          this.setState({ location });
        } else {
          this._pendingLocation = location;
        }
      });
    }
  }
  componentDidMount() {
    this._isMounted = true;
    if (this._pendingLocation) {
      this.setState({ location: this._pendingLocation });
    }
  }
  componentWillUnmount() {
    /* 解除监听 */
    if (this.unlisten) this.unlisten();
  }
  render() {
    return (
      /*  这里可以理解 react.createContext 创建一个 context上下文 ,保存router基本信息。children */);
  }
}
总结:
初始化绑定listen, 路由变化,通知改变location,改变组件。 react的history路由状态是保存在React.Content上下文之间, 状态更新。
一个项目应该有一个根Router , 来产生切换路由组件之前的更新作用。如果存在多个Router会造成,会造成切换路由,页面不更新的情况。
2 Switch-匹配正确的唯一的路由
根据router更新流,来渲染当前组件。
js 体验AI代码助手复制代码/* switch组件 */
class Switch extends React.Component {
  render() {
    return ({/* 含有 history location 对象的 context */}
        {context => {
          invariant(context, 'You should not useoutside a');
          const location = this.props.location || context.location;
          let element, match;
          //我们使用React.Children.forEach而不是React.Children.toArray().find()
          //这里是因为toArray向所有子元素添加了键,我们不希望
          //为呈现相同的两个s触发卸载/重新装载
          //组件位于不同的URL。
          //这里只需然第一个 含有 match === null 的组件
          React.Children.forEach(this.props.children, child => {
            if (match == null && React.isValidElement(child)) {
              element = child;
              // 子组件 也就是 获取 Route中的 path 或者 rediect 的 from
              const path = child.props.path || child.props.from;
              match = path
                ? matchPath(location.pathname, { ...child.props, path })
                : context.match;
            }
          });
          return match
            ? React.cloneElement(element, { location, computedMatch: match })
            : null;
        }});
  }
}
找到与当前path,匹配的组件进行渲染。 通过pathname和组件的path进行匹配。找到符合path的router组件。
matchPath
js 体验AI代码助手复制代码function matchPath(pathname, options = {}) {
  if (typeof options === "string" || Array.isArray(options)) {
    options = { path: options };
  }

  const { path, exact = false, strict = false, sensitive = false } = options;

  const paths = [].concat(path);

  return paths.reduce((matched, path) => {
    if (!path && path !== "") return null;
    if (matched) return matched;

    const { regexp, keys } = compilePath(path, {
      end: exact,
      strict,
      sensitive
    });
    const match = regexp.exec(pathname);
    /* 匹配不成功,返回null */
    if (!match) return null;

    const [url, ...values] = match;
    const isExact = pathname === url;

    if (exact && !isExact) return null;

    return {
      path, // the path used to match
      url: path === "/" && url === "" ? "/" : url, // the matched portion of the URL
      isExact, // whether or not we matched exactly
      params: keys.reduce((memo, key, index) => {
        memo[key.name] = values[index];
        return memo;
      }, {})
    };
  }, null);
}
匹配符合的路由。
3 Route-组件页面承载容器
js 体验AI代码助手复制代码/**
 * The public API for matching a single path and rendering.
 */
class Route extends React.Component {
  render() {
    return ({context => {
          /* router / route 会给予警告警告 */
          invariant(context, "You should not useoutside a");
          // computedMatch 为 经过 swich处理后的 path
          const location = this.props.location || context.location;
          const match = this.props.computedMatch
            ? this.props.computedMatch //already computed the match for us
            : this.props.path
            ? matchPath(location.pathname, this.props)
            : context.match;
          const props = { ...context, location, match };
          let { children, component, render } = this.props;

          if (Array.isArray(children) && children.length === 0) {
            children = null;
          }

          return ({props.match
                ? children
                  ? typeof children === "function"
                    ? __DEV__
                      ? evalChildrenDev(children, props, this.props.path)
                      : children(props)
                    : children
                  : component
                  ? React.createElement(component, props)
                  : render
                  ? render(props)
                  : null
                : typeof children === "function"
                ? __DEV__
                  ? evalChildrenDev(children, props, this.props.path)
                  : children(props)
                : null});
        }});
  }
}匹配path,渲染组件。作为路由组件的容器,可以根据将实际的组件渲染出来。通过RouterContext.Consume 取出当前上一级的location,match等信息。作为prop传递给页面组件。使得我们可以在页面组件中的props中获取location ,match等信息。
4 Redirect-没有符合的路由,那么重定向
重定向组件, 如果来路由匹配上,会重定向对应的路由。
js 体验AI代码助手复制代码function Redirect({ computedMatch, to, push = false }) {
  return ({context => {
        const { history, staticContext } = context;
        /* method就是路由跳转方法。 */
        const method = push ? history.push : history.replace;
        /* 找到符合match的location ,格式化location */
        const location = createLocation(
          computedMatch
            ? typeof to === 'string'
              ? generatePath(to, computedMatch.params)
              : {
                  ...to,
                  pathname: generatePath(to.pathname, computedMatch.params)
                }
            : to
        )
        /* 初始化的时候进行路由跳转,当初始化的时候,mounted执行push方法,当组件更新的时候,如果location不相等。同样会执行history方法重定向 */
        return ({
              method(location);
            }}
              onUpdate={(self, prevProps) => {
              const prevLocation = createLocation(prevProps.to);
              if (
                !locationsAreEqual(prevLocation, {
                  ...location,
                  key: prevLocation.key
                })
              ) {
                method(location);
              }
            }}
              to={to}
          />
        );
      }});
}初始化的时候进行路由跳转,当初始化的时候,mounted执行push方法,当组件更新的时候,如果location不相等。同样会执行history方法重定向。
五 总结 + 流程分析
总结
history提供了核心api,如监听路由,更改路由的方法,已经保存路由状态state。
react-router提供路由渲染组件,路由唯一性匹配组件,重定向组件等功能组件。
流程分析
当地址栏改变url,组件的更新渲染都经历了什么?😊😊😊
拿history模式做参考。当url改变,首先触发histoy,调用事件监听popstate事件, 触发回调函数handlePopState,触发history下面的setstate方法,产生新的location对象,然后通知Router组件更新location并通过context上下文传递,switch通过传递的更新流,匹配出符合的Route组件渲染,最后有Route组件取出context内容,传递给渲染页面,渲染更新。
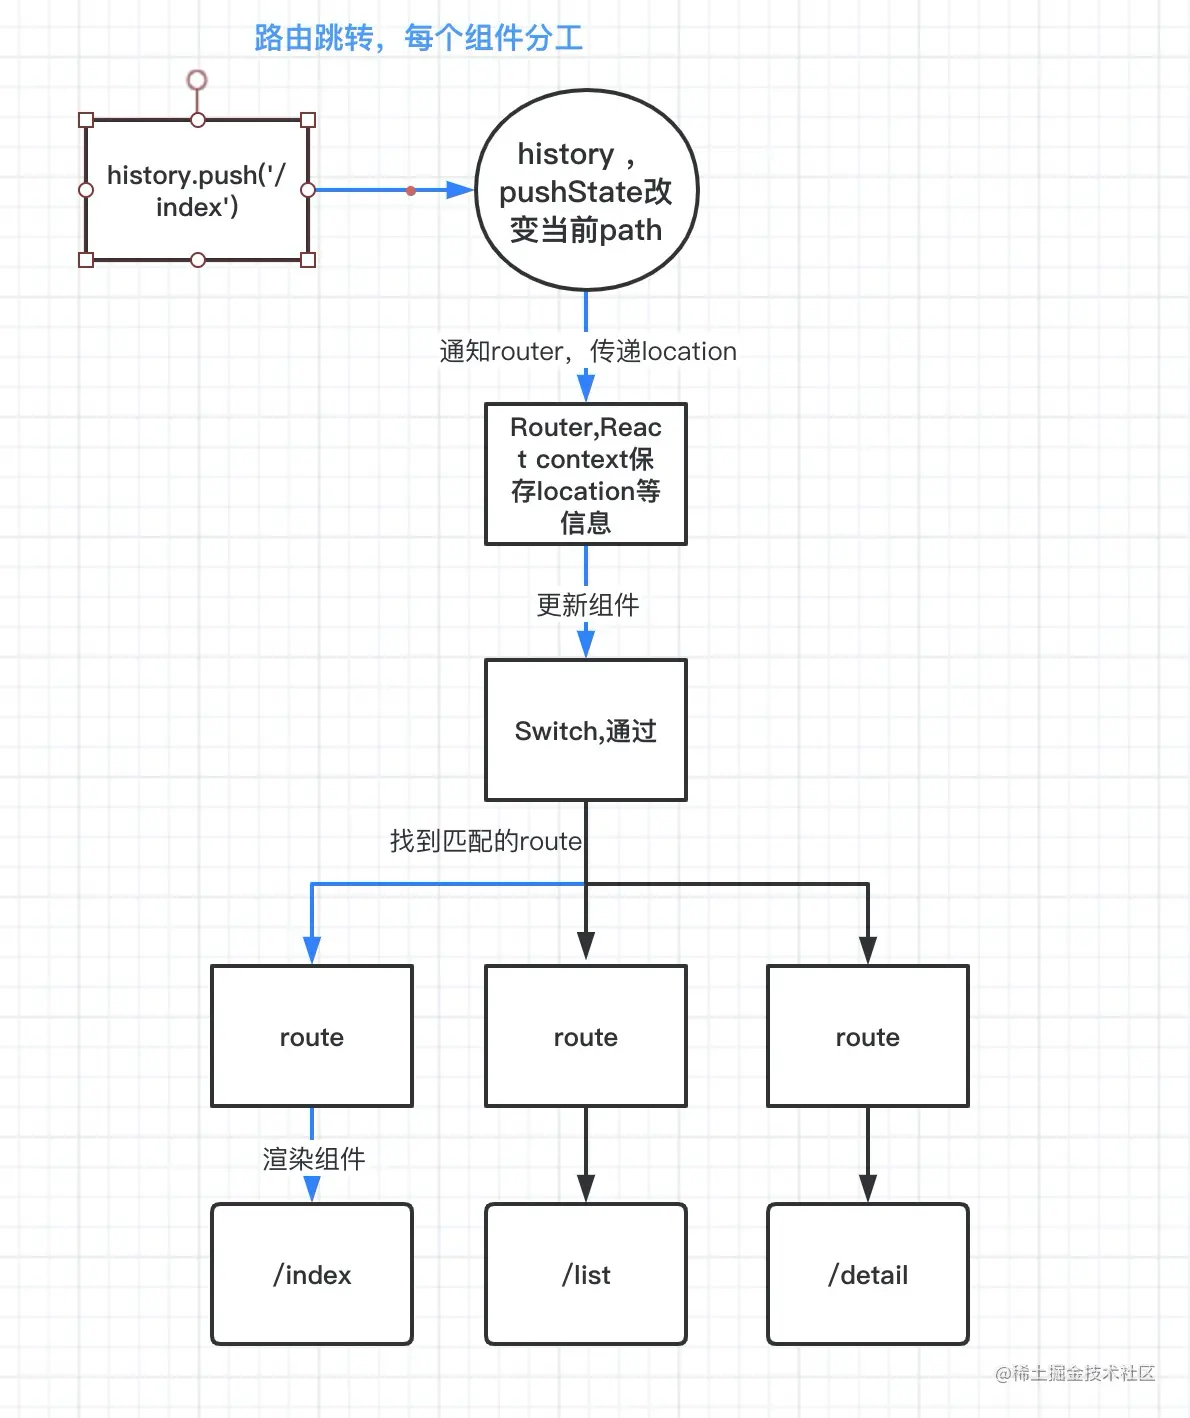
当我们调用history.push方法,切换路由,组件的更新渲染又都经历了什么呢?
我们还是拿history模式作为参考,当我们调用history.push方法,首先调用history的push方法,通过history.pushState来改变当前url,接下来触发history下面的setState方法,接下来的步骤就和上面一模一样了,这里就不一一说了。
我们用一幅图来表示各个路由组件之间的关系。
相关文章

广告赞助


热门文章
-
⛳前端进阶:SEO 全方位解决方案
2023-06-07 -

Claude Code完全指南:2025年最强AI编程助手深度评测
2025-06-06 -

提升前端SEO的技巧与方法
2024-08-04 -

别再吹通用型Al Agent了!其实真实业务都是Workflow
2025-04-28 -
Trae Pro 付费版来啦!🤔 你会掏钱吗?
2025-03-15 -
OCR识别常见的八大开源工具
2023-07-31 -

Vue 3.4 发布
2023-12-29 -
AI - 发现一个超级好用的 AI 聚合平台
2024-06-10
有话要说...